


Here Are Four Breathing Exercises That Will Help Reduce Your Stress
Clear your mind and feel the stress melt away.
Overworked, sleep-deprived or burned out? When stress hits hard, it could manifest physically. Some of its symptoms are exhaustion, headaches, trouble sleeping, and palpitations. It’s during these times that you need to find ways to calm yourself. Kalma lang, kaya ‘yan!
The good news is that one of the best methods to relax is entirely free! By adding some simple breathing exercises to your daily routine, you can be in control of your mind whatever the situation. It won’t take much of your time and you can do them anytime, anywhere.
How’s your breathing?
Nicolette Ereñeta, a 500-hour Registered Yoga Teacher with USA/International yoga alliance, told OneLife.ph about the importance of doing a quick check on how you normally breathe before getting into any techniques and exercises.
Are you a nose breather or a mouth breather? Are you a chest breather or a belly breather?
“Close your eyes, sit up tall. Place your left hand on your belly and your right hand on your chest, and notice how you breathe.”
Which hand is moving up and down? Which hand is moving more? Is it your left or right hand?
She explains that if you are breathing through your nose and / or belly, it indicates that you are not presently in a stressful situation. However, if you have observed that you are a mouth and / or chest breather, then something must be triggering your stress response.
“Being a mouth and / or a chest breather can actually give a variety of long-term health problems, including how you manage yourself in stressful situations,” she adds.
Yoga exercises to help you breathe better
If you’ve noticed that your breathing is a bit shallow (mouth/chest breather), here are four exercises shared by Nicolette that can help you to self-regulate:
Belly Breathing
- Start by imagining that you have a balloon in your belly, and you want to inflate it by inhaling through your nose.
- Then, exhale and release the air out slowly through your nose.
- Keep the emphasis on lengthening the exhalation and repeat until you feel calm.
“Remember to always keep your chest and shoulders relaxed the whole time,” reminds Nicolette.
Three-part Breath
“Imagine your trunk from the hip to the collarbone as an accordion. Every time you breathe in, the accordion expands up vertically, and when you breathe out, the accordion returns to its relaxed state at the center,” Nicolette explains.
In this breathing exercise, you will be having three different air compartments – your belly, rib cage and chest – that you need to fill up one at a time.
“To help you feel this, you can put both hands by the sides of your trunk with the palms resting somewhere between the upper belly and the rib cage. Make sure your fingers and arms are relaxed,” she adds.
- Begin by exhaling completely.
- Slowly inhale through your nose filling only the belly. Once you feel that it’s already filled, move to the second compartment, the rib cage, and fill it with air as well.
- Lastly, when you’ve almost reached the fullest expression of your inhalation, your chest will slightly lift up.
- Exhale slowly through the nose, relaxing the chest first, then the rib cage, and finally the belly as you let the air out. Repeat.
“Make sure you are not rushing your inhale and exhale and not tensing any part of your body… that you are extending the breath to your capacity where you don’t feel any strain.”
Sama Vritti or Equal Part Breathing
Imagine a square in front of you and choose the length of breath appropriate for you.
- If you prefer 3 counts, then breathe in 3 counts, hold the breath for 3 counts, exhale for 3, and hold again for 3. Repeat.
If the three-count breathing is a bit hard for you, Nicolette suggests thinking that you are sipping and blowing air through a straw with your nose in order for you to maximize your lung capacity without straining your breath.
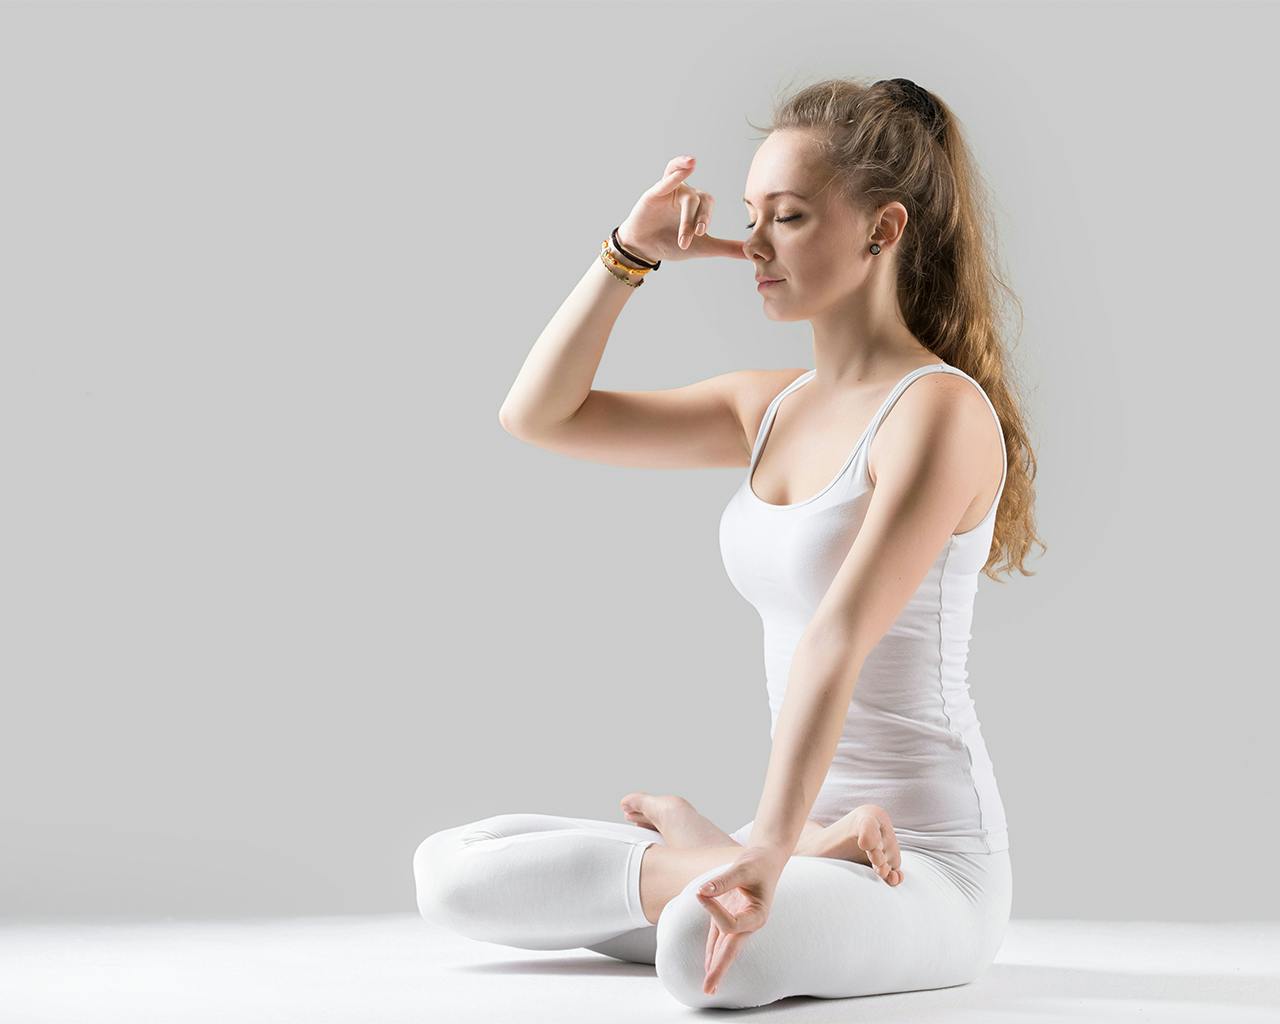
Anulom Vilom / Nadhi Shodana or Alternate Nostril Breathing
Using your right hand, make a conch shell hand gesture with your index and middle finger folded in. In this exercise, you will be using your thumb to close the right nostril and the ring finger to close the left nostril.
- Inhale first and exhale completely.
- Close the left nostril with your ring finger, then start breathing in through your right nostril.
- Close the right nostril, then release and exhale through your left nostril.
- Inhale the left nostril, then close and exhale through your right nostril.
If you experience difficulty in doing exercises 3 and 4, it is best to consult first with a skilled teacher for these techniques to be adjusted based on your capacity and needs.
“If you are a trauma survivor, for instance, holding the breath should not be introduced,” she says.
When and how often can you do these exercises?
- Commit to doing this practice every day. “Be realistic so that it becomes a sustainable practice. You can start with 5, 20, or 30 minutes a day.”
Experiment on the time of day that works best for you. “Ideally, [it’s] the part of the day when you are least distracted to bring about focus and balance. Just make sure that you are practicing this before eating, or two to three hours after a meal.”
- Create your own breathing space at home. “The goal is you want to create the ideal environment that allows you to take a brain break.”
“What’s great about [this] is that you can take it anywhere and you can use it whenever you feel stressed out,” Nicolette shares.
Important reminders
- There is nothing wrong with stress. It is always present, but we can teach ourselves to be resilient.
- Your thoughts impact your physiology. “Mind impacts body, body impacts mind.”
- Include these exercises in your lifestyle and think of them as a form of self-care.
- Enjoy the practice.
This article was originally posted on OneLife.PH.


